Trek Preparation Guide: Everything First-Time Trekkers Need to Know
If you're getting ready for your first trek, you're in the right place. You've probably asked yourself a few questions already — "Am I fit enough?", "What should I carry?", "Do I need special training?" The good news is that you don't need any prior trekking experience to enjoy a trek. What matters most is choosing the right trek for your current fitness level.
Every trek is different. A short weekend hike is nothing like a high-altitude Himalayan trek. That's why preparation isn't about following one fixed routine — it's about understanding what your trek demands.
This guide covers the basics every beginner should know before heading into the mountains.
How Fit Do You Need to Be?
Many people think trekking is only for those who work out every day. That's not true. For most beginner-friendly treks, being reasonably active is enough. If you can walk for an hour without getting exhausted and climb a few flights of stairs comfortably, you already have a good base.
If you've been inactive for a while, don't worry. Even two or three weeks of regular walking, light jogging, or stair climbing can make a noticeable difference.
Simple Ways to Prepare Your Body
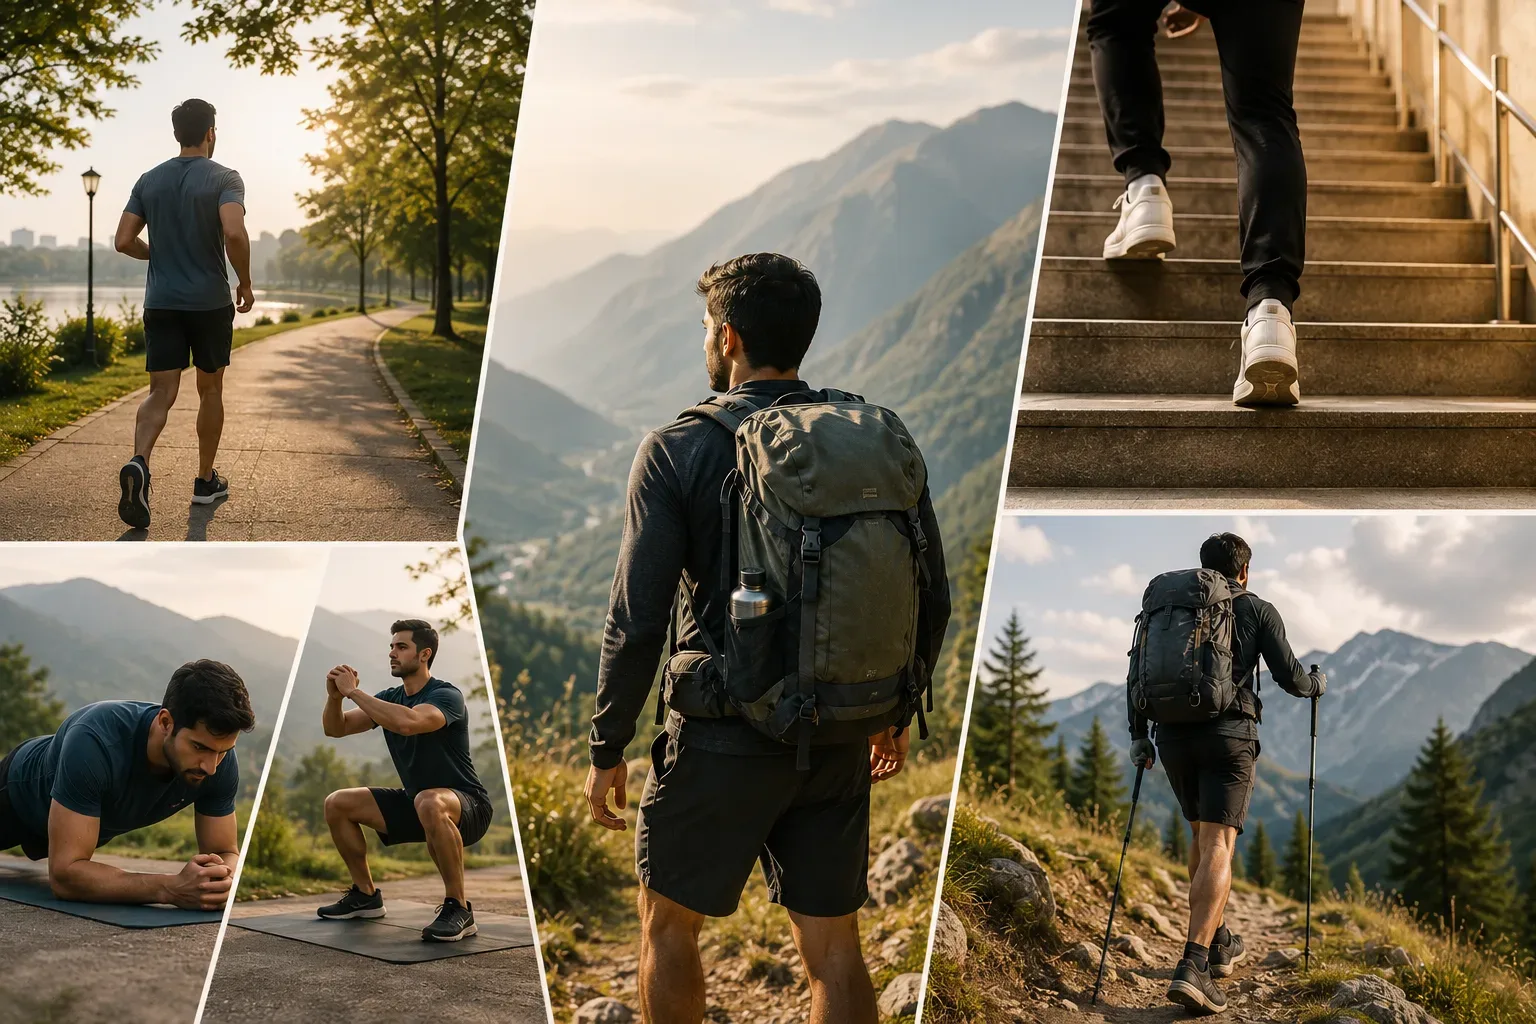
You don't need an expensive gym membership or a complicated workout plan. A few simple habits will prepare you well:
- Walk for 30–60 minutes at least four days a week.
- Use the stairs whenever possible instead of the elevator.
- Do basic strength exercises like squats, lunges, and planks to build leg and core strength.
- Practise with a loaded backpack. If you'll be carrying a pack on the trek, walk with a lightly loaded one during practice. Your shoulders and back will gradually get used to the extra weight.
And my personal favourite test: carry a backpack up 6–8 floors. If you can do it (with short rests in between) and don't feel wrecked afterwards, you're ready for a trek.
Pack Smart, Not Heavy
One of the biggest mistakes beginners make is carrying too much. Remember, you'll be carrying your backpack for hours — every extra kilogram feels heavier as the day goes on.
Here's a simple rule that saves a lot of pain: don't carry things "just in case." You probably won't need a DSLR, an extra pair of jeans, a large perfume bottle, multiple hoodies, or three power banks. Every unnecessary kilogram feels twice as heavy after a few hours of climbing.
What to carry? The absolute Essentials
1. Trekking Shoes
Your shoes matter more than almost anything else you carry. Buy a comfortable, good-quality pair — grip is the priority. Look for a rubber sole rather than plastic or PU, and stick to recognised brands with good reviews. Don't experiment with shoes on a long trek; the wrong pair can ruin the whole experience.
Don't trek in sports shoes or sneakers. Yes, you might see people doing it, but it's simply not worth the risk. Mountain trails are uneven, slippery, and unpredictable. A good pair of trekking shoes gives you better grip, stability, and confidence — especially on descents. If you're planning to trek regularly, investing in proper trekking shoes is one of the best decisions you can make.
On sizing: don't buy shoes that fit too tightly. Leave a little room in front of your toes so they don't hit the shoe while descending. Personally, I also like buying shoes with enough room to comfortably wear two pairs of socks on winter treks — the extra cushioning feels much better during long descents.
If you can, invest in waterproof shoes. Good shoes are an investment. For a monsoon trek, don't cut corners here. Even on snow treks they help a lot — snow itself won't get in, but melted snow mixed with mud (that classic keechad) will soak right through ordinary shoes. That said, don't expect any shoe to be 100% waterproof. Avoid water where you can; waterproofing is peace of mind for accidents, not a licence to jump into puddles.
Some brands worth looking at: Decathlon (Quechua), Salomon, and Columbia. For short to moderate treks, Asian, Wildcraft, and Ozark (by Red Tape) are also worth considering. If you can, visit a store and try them on instead of ordering online.
Bonus tip: Wear your new shoes around for 3–4 days before the trek to break them in and get comfortable.
2. Backpack
You need a backpack that balances weight well and won't fall apart under stress. For the average person, a 50L pack is the sweet spot. 60L is fine too, if you can carry that much weight. Trekking backpacks are called rucksacks — most of the space is organised vertically in a central compartment and accessed from the top.
Get a rucksack with a waist belt, and ideally a chest strap too. Once both are clipped in and adjusted, the bag shouldn't move vertically while you walk. Keep it close to your back, with the straps snug but comfortable.
One detail beginners often get wrong: most of the backpack's weight should rest on your hips, not your shoulders. Tighten the waist belt so your hips carry the load — your shoulders will thank you after a few hours.
Check the build quality, especially the zips. There's a lot of stress on a rucksack, so the zips, straps, and fabric all need to be good. The bag doesn't strictly need to be waterproof, but a rain cover — built in or separate — is essential.
Protect your clothes from rain: Even with a rain cover, put your clothes inside plastic bags or dry bags. Rain covers don't stop water completely during heavy rain. If your pack gets soaked, at least your clothes stay dry. This is one of those tips you usually learn the hard way.
How to organise your bag:
- Outer pockets and pouches — quick-access items: sunscreen, snacks, medicines, power bank.
- Top of the main compartment — things you might need while walking: raincoat, mask, cap.
- Middle — clothes and daily-use items like toilet paper and socks.
- Bottom — things you only need once a day, at camp: warm inners, undergarments. This way you can dig them out inside the tent during rest without unpacking everything.
3. Weather-Appropriate Clothing
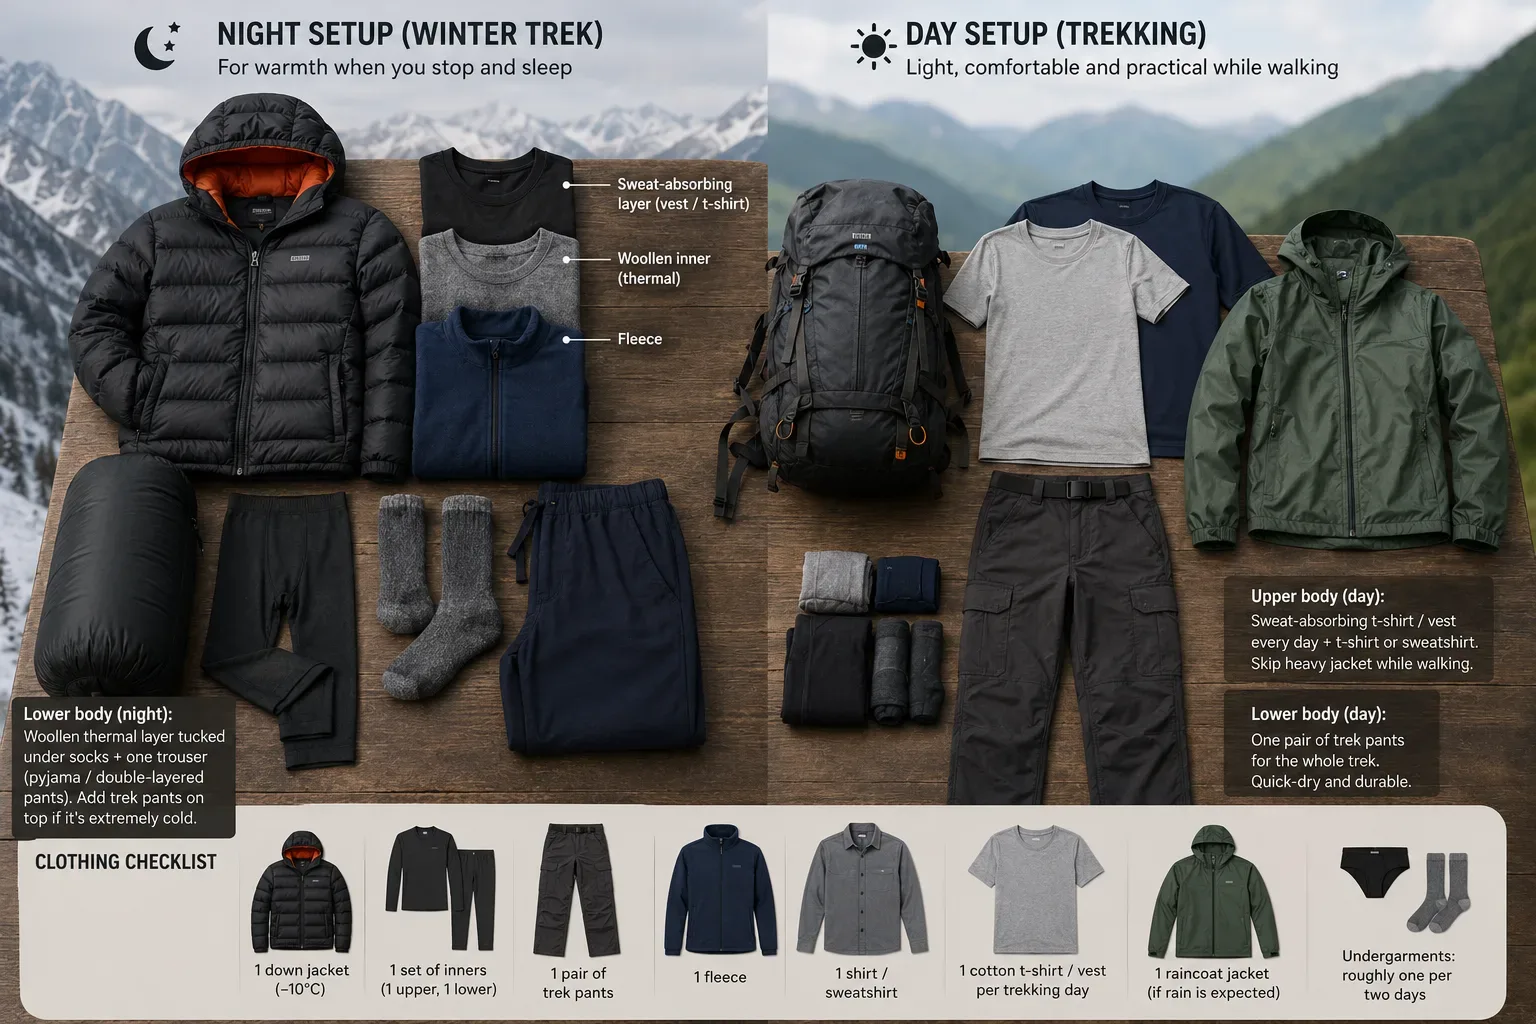
Pack according to the season — a winter trek and a summer trek call for very different kits. Here's the setup I recommend personally.
A quick word on layering before the lists — each layer has a job:
- Cotton vest / t-shirt — absorbs sweat
- Thermal (woollen inner) — traps body heat
- Fleece — adds insulation by trapping warm air
- Down jacket — keeps you warm when you stop walking
Once you understand why each layer exists, the packing list makes a lot more sense.
For the night (no compromises):
- Lower body: A woollen thermal layer for heat, tucked under your socks to trap air and stop heat from leaking out. Over that, one trouser (pyjamas or double-layered trek pants). Keep these two just for the night. If the cold feels unbearable, add your trek pants on top. Two or three layers inside the sleeping bag are more than enough.
- Upper body: Start with a sweat-absorbing layer (cotton vest or t-shirt), then a full-sleeve woollen inner, then a fleece for more heat trapping. Optional: a shirt or sweatshirt over that. Finally, a heavy down jacket. For temperatures around −5°C to −10°C, I recommend a jacket rated to −10°C — if you feel too warm, just remove a middle layer (shirt or fleece). A good jacket is worth the investment. Keep the inner layers for night only — don't sweat in them.
For the day:
- Lower body: One pair of trek pants for the whole trek. Go for quick-dry ones — Decathlon's are good on strength and durability. On a budget, cargos work well; pick a pair with the two extra pockets near the knees (great for quick snacks). Avoid tight jeans.
- Upper body: One sweat-absorbing cotton t-shirt or half-sleeve vest per trekking day — you'll sweat a lot, so you want a fresh sweat layer daily. Over it, a t-shirt or sweatshirt. A heavy jacket isn't practical while walking, so skip it during the day.
Cold-weather hack: If you feel unusually cold during the day, wear a plastic raincoat jacket (full sleeve, waist length) over your layers — open the zip when you warm up.
Sweat tip: Even if you feel hot and sweaty, don't try to cool down or air out your sweat. Keep your shirt or sweatshirt on and let your body dry and cool off slowly. Rapid cooling in the mountains is how you catch a chill.
Socks : Carry n/2 pairs of socks, where n is the number of trekking days, plus one pair kept only for sleeping. If your feet aren't sweating much, it's fine to reuse a pair. Choose thick woollen socks that wick moisture — not the hand-knitted kind.
Clothing checklist:
- 1 down jacket (−10°C)
- 1 set of inners (1 upper, 1 lower)
- 1 pair of trek pants
- 1 fleece
- 1 shirt / sweatshirt
- 1 cotton t-shirt / vest per trekking day
- 1 raincoat jacket (if rain is expected)
- Undergarments: roughly one per two days
4. Water
Carry a water bottle, and a flask if you can. If the trek isn't too cold, a plastic bottle is fine and saves weight.
Group pro tip: If you're trekking as a group, you don't all need to carry a flask. One person carries the flask, another carries a plastic bottle.
5. Gloves
On a winter trek, gloves are extremely important. Don't buy ordinary woollen gloves — get a good-quality pair, preferably waterproof. A single solid pair is enough; a separate fleece glove usually isn't needed.
Hygiene hack: If your gloves are waterproof, keep them on and rinse them from the fingertips instead of taking them off to wash your hands — for example, after using the toilet. Your hands stay clean and dry for eating.
6. Head and Face Protection
-Sunglasses — extremely important for eye protection at altitude. Avoid aviators and heavy frames — go for a pair with UV protection and polarised lenses.
- Sun hat or cap — important for sun protection. A round hat or a regular cap both work.
- Buff / bandana + woollen cap — extremely important. During the day you'll face harsh sunlight and strong winds, and you need to protect your facial skin. I prefer a buff because it can cover both your face and head, works as a mask, doubles as a headband to cover your ears, and can be pulled over your nose at night when the air turns cold.
Why does this matter so much? Because you'll sweat a lot. Sunscreen won't last half an hour once you sweat and wipe your face, and no moisturiser stands up to fast mountain wind. Covering your face is simply the best option.
You can get a buff at Decathlon, but I really prefer the bamboo-fabric ones — extremely soft and flexible. Just don't stretch them too hard, and note they take a little longer to dry than the Decathlon version. (Bonus: they look cool af.)
A woollen cap or beanie matters at night, or on windy, cold treks where you need to cover your head and ears. If you already have a woollen buff, you may not need one. For treks that aren't sub-zero, a buff is usually enough; if extreme cold is expected, a woollen cap/beanie will be far more effective.
7. Trekking Pole
A trekking pole transfers 30–40% of your weight from your legs to your arms. It's extremely useful for balance on descents and for navigating rocky or awkward terrain. Invest in a good-quality one — the rentals aren't always reliable.
Don't rely on a tree stick: it can snap, splinter into your hand, and offers no real grip. Treat it as a last resort only.
And don't be overconfident — if you don't own a pole, always rent one on your first trek. You might think you don't need it early on, but you'll feel the need soon enough. Some people carry two poles; it helps a little, but keeping one hand free is worth more, so I'd stick to one.
Daily Care and Hygiene
1. Toilet paper — extremely important.
On cold Himalayan treks, especially when temperatures drop below 10°C, avoid washing with cold water after using the toilet if you can. Cold water cools your body quickly and can leave you uncomfortable for a long time. Toilet paper is far more practical in these conditions.
Toilet paper is versatile, too: use it as tissue, to absorb moisture, or to quick-dry clothes.
Emergency hack: If you're out of dry socks and your feet are wet, wrap toilet paper around your feet, put a plastic bag over it, then pull the damp sock on top. The paper absorbs the sweat. This is an emergency measure only — air your feet out whenever you get the chance.
-Wet Wipes — Since you won't be bathing for days, wet wipes are your main way to clean your body, hands, face, and feet. Because washing with cold water is best avoided, they're a much safer alternative. You won't maintain perfect hygiene, but you'll stay reasonably clean.
- Wet wipes contain alcohol, which can dry out your skin — don't overuse them.
- Buy biodegradable wipes only (they'll say so on the pack). If they aren't biodegradable, throw them in your trek provider's bins or carry them out until you find a dustbin.
Also Carry :
toothbrush, hand sanitiser, moisturiser, sunscreen (important), and a power bank.
Keep your phone and power bank inside separate zip-lock bags. It weighs nothing and saves you from a very bad day.
-Lip balm — Don't skip this — mountain sun and cold wind will wreck your lips within a day.
Trim your toenails before the trek.
Long nails press against the front of your shoe while descending and become surprisingly painful. It's one sentence of advice that almost every experienced trekker learns the hard way.
Medicines.
Trek guides usually carry basic medicines, but if you take a regular painkiller or any personal medication, carry your own.
Good to Have
Keep these separate from your essentials so your core kit stays lean. Nice to have, not required:
- Headlamp (for early-morning or night starts)
- Blister tape / band-aids
- Small first-aid kit
- Extra zip-lock and plastic bags (2–3 — great for separating dirty clothes, storing wet socks, keeping electronics dry, or as an emergency waterproof pouch)
- Trek pillow (optional)
- Ear plugs (useful in shared tents)
- Playing cards (optional)
Food and Water - Matter More Than You Think
Trekking burns noticeably more energy than a normal walk, and how you eat directly affects how you feel on the trail.
Start your day with a proper breakfast, even if you're not hungry. Eat your food warm and chew properly — digestion is harder at higher altitudes. Favour lighter foods like dalia and khichdi over fried items like pakoras and poori, which are often served but sit heavily. Your breakfast, lunch, and dinner provide your steady, long-lasting energy.
But steady meals aren't the whole story. On a steep climb you may suddenly feel drained — that's where quick sugars help. A chocolate bar (the ones with peanuts, fruits, and nuts are even better), some glucose, candies, or an ORS drink can give you a fast boost. Just don't rely on them as meal replacements. (Skip the sugar boosters if you're diabetic.)
Also carry slower snacks like dry fruits, trail mix, or protein bars to keep your energy up between meals.
Hydration is just as important. Even in cold weather, your body keeps losing water while you walk. Instead of gulping a lot at once, take small sips regularly through the day, and drink with your snacks. When you feel exhausted, keep sipping — it genuinely helps. At high altitude, staying hydrated matters even more.
Bonus: Add glucose or ORS to your water to boost its effectiveness and improve the taste.
Finally, avoid namkeens, fried foods, and anything hard to digest on the trail.
Preparing for Different Types of Treks
Easy Treks
Ideal for beginners and families. Most people can finish them without extensive preparation.
- Walk regularly for a couple of weeks beforehand.
- Wear comfortable trekking shoes.
- Focus on enjoying the experience rather than walking fast.
Moderate Treks
These usually involve longer days and steeper climbs. Give yourself three to four weeks to prepare by walking longer distances, climbing stairs, and building overall stamina.
Difficult Treks
These demand good fitness and consistency. Long days, uneven terrain, and higher altitudes can be physically demanding. Before choosing one, make sure you're already comfortable with moderate treks.
Focus on:
- Building stamina with regular walking, jogging, or cycling.
- Practising stair climbing with a small backpack.
- Strengthening your legs and core.
- Getting comfortable walking 5–6 hours a day.
Advanced Treks
Meant for experienced trekkers. These routes involve very high altitude and unpredictable weather, and good fitness alone isn't enough — experience matters just as much. Before attempting one, you should already be comfortable with difficult treks and understand how your body responds to long days in the mountains.
Two things become especially important:
- Previous high-altitude trekking experience.
- Good endurance and recovery.
Always start with easy treks. You need to learn how to survive and stay comfortable with limited supplies before you can enjoy the long ones. A serious trek will test your survival instincts, endurance, and mental strength. Don't be overconfident — build up incrementally.
Common Mistakes First-Time Trekkers Make
A little planning helps you avoid the most common mistakes:
- Packing more than you need. Every kilogram counts at altitude. Calculate what you actually need — and leave the rest.
- Walking too fast at the start. The first few kilometres feel easy. Don't get excited and start overtaking everyone — the mountain is much longer than it looks. Slow and steady wins here.
- Drinking too little water. Drink when you're thirsty, and sip steadily when you're sweating.
- Ignoring the weather forecast. Carry a poncho or raincoat if rain is likely, and a warm jacket appropriate to the temperature.
- Sleeping late the night before. Rest is essential after (and before) an exhausting day. Even if you can't sleep, lying down and resting beats wandering around and burning energy.
- Overestimating yourself. The mountain will test you in every way — respect it. Don't let your ego make decisions for you. If someone experienced gives you advice, listen and follow it.
The mountains reward preparation and humility more than raw fitness. Prepare well, pack light, respect the trail — and enjoy every step of it.